Copyright © 2003, 2004, 2005, 2006 Simon Mater, Thomas M. Eastep
Permission is granted to copy, distribute and/or modify this document under the terms of the GNU Free Documentation License, Version 1.2 or any later version published by the Free Software Foundation; with no Invariant Sections, with no Front-Cover, and with no Back-Cover Texts. A copy of the license is included in the section entitled “GNU Free Documentation License”.
2009/08/26
Table of Contents
Caution
This article applies to Shorewall 3.0 and later and to OpenVPN 2.0 and later. If you are running a version of Shorewall earlier than Shorewall 3.0.0 then please see the documentation for that release.
OpenVPN is a robust and highly configurable VPN (Virtual Private Network) daemon which can be used to securely link two or more private networks using an encrypted tunnel over the Internet. OpenVPN is an Open Source project and is licensed under the GPL. OpenVPN can be downloaded from http://openvpn.net/.
Unless there are interoperability issues (the remote systems do not support OpenVPN), OpenVPN is my choice any time that I need a VPN.
It is widely supported -- I run it on both Linux and Windows XP.
It requires no kernel patching.
It is very easy to configure.
It just works!
I recommend reading the VPN Basics article if you plan to implement any type of VPN.
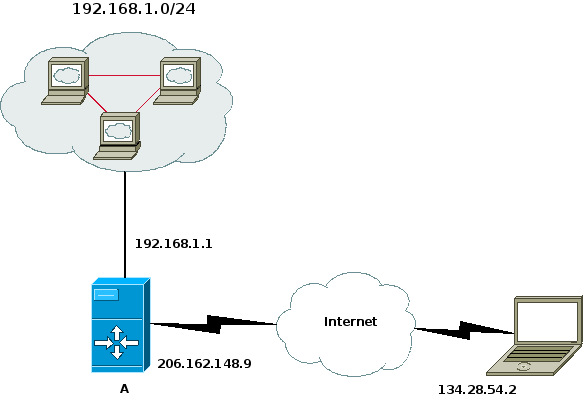
Suppose that we have the following situation:

We want systems in the 192.168.1.0/24 subnetwork to be able to
communicate with the systems in the 10.0.0.0/8 network. This is
accomplished through use of the
/etc/shorewall/tunnels file and the
/etc/shorewall/policy file and OpenVPN.
While it was possible to use the Shorewall start and stop script to start and stop OpenVPN, I decided to use the init script of OpenVPN to start and stop it.
On each firewall, you will need to declare a zone to represent the
remote subnet. We'll assume that this zone is called “vpn”
and declare it in /etc/shorewall/zones on both
systems as follows.
/etc/shorewall/zones— Systems A & B#ZONE TYPE OPTIONS IN OUT # OPTIONS OPTIONS vpn ipv4
On system A, the 10.0.0.0/8 will comprise the vpn zone.
In
/etc/shorewall/interfaceson system A:#ZONE INTERFACE BROADCAST OPTIONS vpn tun0
In /etc/shorewall/tunnels on system A, we need
the following:
#TYPE         ZONE           GATEWAY        GATEWAY ZONE
openvpn       net            134.28.54.2
This entry in /etc/shorewall/tunnels opens the
firewall so that OpenVPN traffic on the default port 1194/udp will be
accepted to/from the remote gateway. If you change the port used by
OpenVPN to 7777, you can define /etc/shorewall/tunnels like this:
/etc/shorewall/tunnels with port 7777:
#TYPE             ZONE           GATEWAY         GATEWAY ZONE
openvpn:7777      net            134.28.54.2
Similarly, if you want to use TCP for your tunnel rather than UDP (the default), then you can define /etc/shorewall/tunnels like this:
/etc/shorewall/tunnels using TCP:
#TYPE             ZONE           GATEWAY         GATEWAY ZONE
openvpn:tcp       net            134.28.54.2
Finally, if you want to use TCP and port 7777:
/etc/shorewall/tunnels using TCP port 7777:
#TYPE             ZONE           GATEWAY         GATEWAY ZONE
openvpn:tcp:7777  net            134.28.54.2
This is the OpenVPN config on system A:
dev tun
local 206.162.148.9
remote 134.28.54.2
ifconfig 192.168.99.1 192.168.99.2
route 10.0.0.0 255.0.0.0 192.168.99.2
tls-server
dh dh1024.pem
ca ca.crt
cert my-a.crt
key my-a.key
comp-lzo
verb 5
Similarly, On system B the 192.168.1.0/24 subnet will comprise the vpn zone
In
/etc/shorewall/interfaceson system B:#ZONE INTERFACE BROADCAST OPTIONS vpn tun0
In /etc/shorewall/tunnels on system B, we
have:
#TYPE         ZONE           GATEWAY        GATEWAY ZONE
openvpn       net            206.191.148.9
And in the OpenVPN config on system B:
dev tun
local 134.28.54.2
remote 206.162.148.9
ifconfig 192.168.99.2 192.168.99.1
route 192.168.1.0 255.255.255.0 192.168.99.1
tls-client
ca ca.crt
cert my-b.crt
key my-b.key
comp-lzo
verb 5
You will need to allow traffic between the “vpn” zone and the “loc” zone on both systems -- if you simply want to admit all traffic in both directions, you can use the policy file:
/etc/shorewall/policyon systems A & B#SOURCE DEST POLICY LOG LEVEL loc vpn ACCEPT vpn loc ACCEPT
On both systems, restart Shorewall and start OpenVPN. The systems in the two masqueraded subnetworks can now talk to each other.
OpenVPN 2.0 provides excellent support for roadwarriors. Consider the setup in the following diagram:
On the gateway system (System A), we need a zone to represent the remote clients — we'll call that zone “road”.
/etc/shorewall/zones— System A:#ZONE TYPE OPTIONS IN OUT # OPTIONS OPTIONS road ipv4
On system A, the remote clients will comprise the road zone.
In
/etc/shorewall/interfaceson system A:#ZONE INTERFACE BROADCAST OPTIONS road tun+
In /etc/shorewall/tunnels on system A, we need
the following:
#TYPE         ZONE           GATEWAY        GATEWAY ZONE
openvpn:1194  net            0.0.0.0/0
If you are running Shorewall 2.4.3 or later, you might prefer the
following in /etc/shorewall/tunnels on system A.
Specifying the tunnel type as openvpnserver has the advantage that the VPN
connection will still work if the client is behind a gateway/firewall that
uses NAT.
#TYPE               ZONE           GATEWAY        GATEWAY ZONE
openvpnserver:1194  net            0.0.0.0/0
We want the remote systems to have access to the local LAN — we do
that with an entry in /etc/shorewall/policy (assume
that the local LAN comprises the zone “loc”).
#SOURCE      DESTINATION        POLICY
road         loc                ACCEPT
The OpenVPN configuration file on system A is something like the following:
dev tun

server 192.168.2.0 255.255.255.0

dh dh1024.pem

ca /etc/certs/cacert.pem

crl-verify /etc/certs/crl.pem

cert /etc/certs/SystemA.pem
key /etc/certs/SystemA_key.pem

port 1194

comp-lzo

user nobody

group nogroup

ping 15
ping-restart 45
ping-timer-rem
persist-tun
persist-key

verb 3
Configuration on the remote clients follows a similar line. We define a zone to represent the remote LAN:
/etc/shorewall/zones— System B:#ZONE TYPE OPTIONS IN OUT # OPTIONS OPTIONS home ipv4
On system A, the hosts accessible through the tunnel will comprise the home zone.
In
/etc/shorewall/interfaceson system B:#ZONE INTERFACE BROADCAST OPTIONS home tun0
In /etc/shorewall/tunnels on system B, we need
the following:
#TYPE         ZONE           GATEWAY        GATEWAY ZONE
openvpn:1194  net            206.162.148.9
Again, if you are running Shorewall 2.4.3 or later, in
/etc/shorewall/tunnels on system B you might
prefer:
#TYPE               ZONE           GATEWAY        GATEWAY ZONE
openvpnclient:1194  net            206.162.148.9
We want the remote client to have access to the local LAN — we do
that with an entry in /etc/shorewall/policy.
#SOURCE      DESTINATION        POLICY
$FW          home               ACCEPT
The OpenVPN configuration on the remote clients is along the following line:
dev tun
remote 206.162.148.9
up /etc/openvpn/home.up

tls-client
pull

ca /etc/certs/cacert.pem

cert /etc/certs/SystemB.pem
key /etc/certs/SystemB_key.pem

port 1194

user nobody
group nogroup

comp-lzo

ping 15
ping-restart 45
ping-timer-rem
persist-tun
persist-key

verb 3
If you want multiple remote clients to be able to communicate openly with each other then you must:
Include the client-to-client directive in the server's OpenVPN configuration; or
Specify the routeback option on the
tun+device in /etc/shorewall/interfaces.
This section will describe how we once secured our home wireless network using OpenVPN. Our network as it was then[1] is as shown in the following diagram.
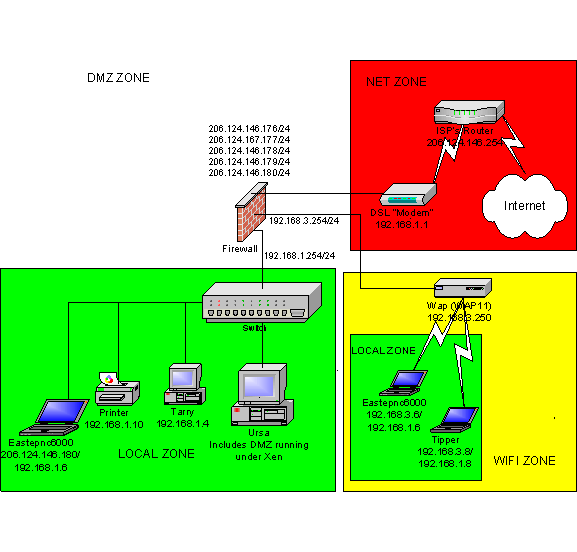
The Wireless network is in the lower right of the diagram and
consists of two laptops: Eastepnc6000 (Dual Boot Windows XP - SP1, SUSE
10.0) and Tipper (SUSE 10.0). We used OpenVPN to bridge those two laptops
with the local LAN shown in the lower left hand corner. The laptops were
configured with addresses in the 192.168.3.0/24 network connected to the
firewall's eth0 interface which
places them in the firewall's Wifi zone.
OpenVPN bridging allowed them to be assigned an additional IP address from
the 192.168.1.0/24 network and to be securely bridged to the LAN on the
lower left.
Note
Eastepnc6000 is shown in both the local LAN and in the Wifi zone with IP address 192.168.1.6 -- clearly, the computer could only be in one place or the other. Tipper could also be in either place and would have the IP address 192.168.1.8 regardless.
The firewall ran Debian Sarge so the bridge was defined in
/etc/network/interfaces.
# LAN interface
auto br0
iface br0 inet static
        address 192.168.1.254
        netmask 255.255.255.0
        pre-up /usr/sbin/openvpn --mktun --dev tap0
        pre-up /sbin/ip link set tap0 up
        pre-up /sbin/ip link set eth3 up
        pre-up /usr/sbin/brctl addbr br0
        pre-up /usr/sbin/brctl addif br0 eth3
        pre-up /usr/sbin/brctl addif br0 tap0
        pre-down /usr/sbin/brctl delif br0 eth3
        pre-down /sbin/ip link set eth3 down
        pre-down /usr/sbin/brctl delif br0 tap0
        pre-down /sbin/ip link set tap0 down
        post-down /usr/sbin/brctl delbr br0
        post-down /usr/sbin/openvpn --rmtun --dev tap0
Note that the IP address assigned to the bridge is 192.168.1.254 -- that was the default gateway address for hosts in the local zone.
We used X.509 certificates for authentication.
/etc/openvpn/server-bridge.conf defined a bridge and reserved IP addresses 192.168.1.64-192.168.1.71 for VPN clients. Note that the bridge server only used local IP address 192.168.3.254. We ran two instances of OpenVPN; this one and a second tunnel-mode instance for remote access.
dev tap0

local 192.168.3.254

server-bridge 192.168.1.254 255.255.255.0 192.168.1.64 192.168.1.71

client-to-client

dh dh1024.pem

ca /etc/certs/cacert.pem

crl-verify /etc/certs/crl.pem

cert /etc/certs/gateway.pem
key /etc/certs/gateway_key.pem

port 1194

comp-lzo

user nobody
group nogroup

keepalive 15 45
ping-timer-rem
persist-tun
persist-key

client-config-dir /etc/openvpn/bridge-clients
ccd-exclusive

verb 3
The files in /etc/openvpn/bridge-clients
were used to assign a fixed IP address to each laptop. For example,
tipper.shorewall.net:
ifconfig-push 192.168.1.8 255.255.255.0
/etc/openvpn/wireless.conf:
dev tap

remote 192.168.3.254
tls-remote gateway.shorewall.net

client

redirect-gateway

ca /etc/certs/cacert.pem

cert /etc/certs/tipper.pem
key /etc/certs/tipper_key.pem

port 1194

comp-lzo

ping 15
ping-restart 45
ping-timer-rem
persist-tun
persist-key

mute-replay-warnings

verb 3
C:\Program Files\Openvpn\config\homewireless.ovpn:
dev tap
remote 192.168.3.254
tls-remote gateway.shorewall.net

tls-client
pull

ca "/Program Files/OpenVPN/certs/cacert.pem"

cert "/Program Files/OpenVPN/certs/eastepnc6000.pem"
key "/Program Files/OpenVPN/certs/eastepnc6000_key.pem"

redirect-gateway

port 1194

comp-lzo

ping 15
ping-restart 45
ping-timer-rem
persist-tun
persist-key

verb 3
The configuration was the same as shown above only with "/Program Files/OpenVPN" replaced with "/etc/openvpn" (I love OpenVPN).
In December 2007, I acquired a new laptop that runs Windows Vista. After a frustrating effort, I managed to get it working. The keys to getting it working were:
You must run a version of OpenVPN that is "Vista Ready" -- I used Matias Sundman's combined OpenVPN 2.1_rc4/OpenVPN GUI 1.0.3 installer (see http://openvpn.se/).
OpenVPN GUI must be run as the Administrator. In the Explorer, right click on the OpenVPN GUI binary and select Properties->Compatibility and select "Run this program as an administrator".
If you encounter problems where everything looks correct but it doesn't work, reboot and try it again.
In this configuration, we didn't need any firewalling between the laptops and the local LAN so we set BRIDGING=No in shorewall.conf. The configuration of the bridge then became as described in the Simple Bridge documentation. If you need to control the traffic allowed through the VPN bridge then you will want to configure Shorewall as shown in the Bridge/Firewall documentation.
Note that the bridge (br0) is defined as the interface to the local zone and has the routeback option.
#ZONE   INTERFACE       BROADCAST               OPTIONS
net     eth2            206.124.146.255         dhcp,norfc1918,logmartians,blacklist,tcpflags,nosmurfs
loc     br0             192.168.1.255           dhcp,routeback
dmz     eth1            -                       logmartians
Wifi    eth0            192.168.3.255           dhcp,maclist
#LAST LINE -- ADD YOUR ENTRIES BEFORE THIS ONE -- DO NOT REMOVEWireless networks pose a threat to all systems that are connected to them and we therefore ran Firewalls on the two Laptops. Eastepnc6000 ran Sygate™ Security Agent and Tipper ran a Shorewall-based Netfilter firewall.
#ZONE   TYPE    OPTIONS                 IN                      OUT
#                                       OPTIONS                 OPTIONS
lan     ipv4    #Wired LAN at our home
net     ipv4
#LAST LINE - ADD YOUR ENTRIES ABOVE THIS ONE - DO NOT REMOVE
#ZONE    INTERFACE      BROADCAST       OPTIONS
#
net      eth0           detect          routefilter,dhcp,tcpflags
lan      tap0           192.168.1.255
#LAST LINE -- ADD YOUR ENTRIES BEFORE THIS ONE -- DO NOT REMOVESince we didn't expect any traffic between the net zone and the lan zone, we used NONE policies for that traffic. If any such traffic would have occurred, it would have been handled according to the all->all policy.
#SOURCE         DEST            POLICY          LOG             LIMIT:BURST
#                                               LEVEL
fw              net             ACCEPT
fw              lan             ACCEPT
lan             fw              ACCEPT
net             lan             NONE
lan             net             NONE
net             all             DROP            info
# The FOLLOWING POLICY MUST BE LAST
all             all             REJECT          info
#LAST LINE -- DO NOT REMOVE