Copyright © 2003-2005 Thomas M. Eastep
Permission is granted to copy, distribute and/or modify this document under the terms of the GNU Free Documentation License, Version 1.2 or any later version published by the Free Software Foundation; with no Invariant Sections, with no Front-Cover, and with no Back-Cover Texts. A copy of the license is included in the section entitled “GNU Free Documentation License”.
2007/11/12
Table of Contents
Caution
This article applies to Shorewall 3.0 and later. If you are running a version of Shorewall earlier than Shorewall 3.0.0 then please see the documentation for that release.
While most configurations can be handled with each of the firewall's network interfaces assigned to a single zone, there are cases where you will want to divide the hosts accessed through an interface between two or more zones.
The interface has multiple addresses on multiple subnetworks. This case is covered in the Aliased Interface documentation.
You are using some form of NAT and want to access a server by its external IP address from the same LAN segment. This is covered in FAQs 2 and 2a.
There are routers accessible through the interface and you want to treat the networks accessed through that router as a separate zone.
Some of the hosts accessed through an interface have significantly different firewalling requirements from the others so you want to assign them to a different zone.
The key points to keep in mind when setting up multiple zones per interface are:
Shorewall generates rules for zones in the order that the zone declarations appear in /etc/shorewall/zones unless you modify the processing order using the explicit child-zone:parent-zone syntax, in which case the child zone rules are generated first.
The order of entries in /etc/shorewall/hosts is immaterial as far as the generated ruleset is concerned.
These examples use the local zone but the same technique works for any zone. Remember that Shorewall doesn't have any conceptual knowledge of “Internet”, “Local”, or “DMZ” so all zones except the firewall itself ($FW) are the same as far as Shorewall is concerned. Also, the examples use private (RFC 1918) addresses but public IP addresses can be used in exactly the same way.
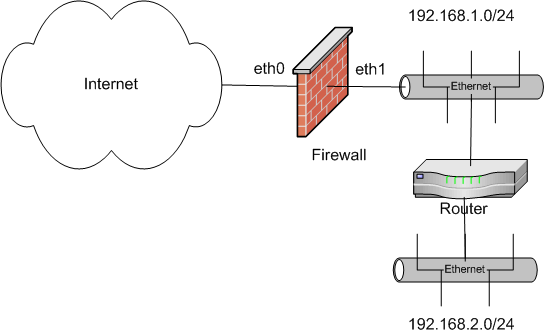
Here is an example of a router in the local zone.
Note
the box called “Router” could be a VPN server or other such device; from the point of view of this discussion, it makes no difference.
In many cases, the standard two-interface Shorewall setup will work fine in this configuration. It will work if:
The firewall requirements to/from the internet are the same for 192.168.1.0/24 and 192.168.2.0/24.
The hosts in 192.168.1.0/24 know that the route to 192.168.2.0/24 is through the router.
All you have to do on the firewall is add a route to 192.168.2.0/24 through the router and restart Shorewall.
If the firewalling requirements for the two local networks is the same but the hosts in 192.168.1.0/24 don't know how to route to 192.168.2.0/24 then you need to configure the firewall slightly differently. This type of configuration is rather stupid from an IP networking point of view but it is sometimes necessary because you simply don't want to have to reconfigure all of the hosts in 192.168.1.0/24 to add a persistent route to 192.168.2.0/24. On the firewall:
Add a route to 192.168.2.0/24 through the Router.
Set the “routeback” option for eth1 (the local firewall interface) in /etc/shorewall/interfaces.
Restart Shorewall.
If you need to make 192.168.2.0/24 into its own zone, you can do it one of two ways; Nested Zones or Parallel Zones.
You can define one zone (called it “loc”) as being all hosts connectied to eth1 and a second zone “loc1” (192.168.2.0/24) as a sub-zone.
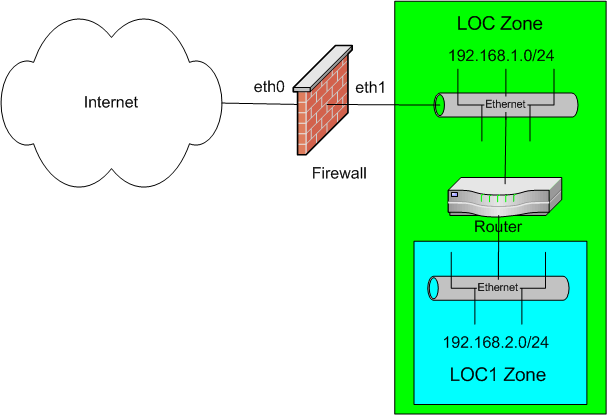
The advantage of this approach is that the zone “loc1” can use CONTINUE policies such that if a connection request doesn't match a “loc1” rule, it will be matched against the “loc” rules. For example, if your loc1->net policy is CONTINUE then if a connection request from loc1 to the internet doesn't match any rules for loc1->net then it will be checked against the loc->net rules.
/etc/shorewall/zones
#ZONE       TYPE      OPTIONS
loc         ipv4
loc1:loc    ipv4
Note
the Parent zone (loc) is defined first then the sub-zone (loc1) is defined using the special syntax shown.
/etc/shorewall/interfaces
#ZONE               INTERFACE           BROADCAST
loc                 eth1                192.168.1.255
/etc/shorewall/hosts
#ZONE               HOSTS
loc1                eth1:192.168.2.0/24
If you don't need Shorewall to set up infrastructure to route traffic between “loc” and “loc1”, add these two policies.
/etc/shorewall/policy
#SOURCE             DEST                 POLICY
loc                 loc1                 NONE
loc1                loc                  NONE
You define both zones in the /etc/shorewall/hosts file to create two disjoint zones.
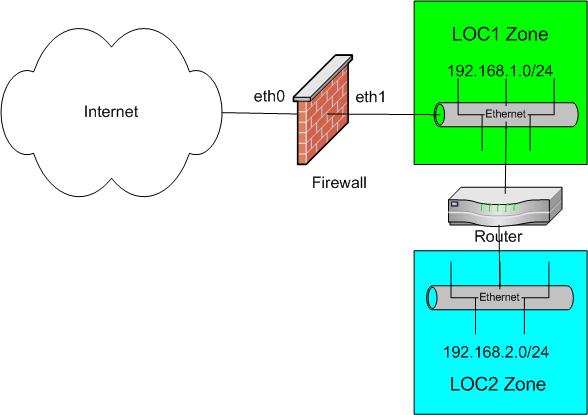
/etc/shorewall/zones
#ZONE       TYPE      OPTIONS
loc1        ipv4
loc2        ipv4
/etc/shorewall/interfaces
#ZONE               INTERFACE           BROADCAST
-                   eth1                192.168.1.255
/etc/shorewall/hosts
#ZONE               HOSTS
loc1                eth1:192.168.1.0/24
loc2                eth1:192.168.2.0/24
You don't need Shorewall to set up infrastructure to route traffic between “loc” and “loc1”, so add these two policies:
#SOURCE             DEST                 POLICY
loc1                loc2                 NONE
loc2                loc1                 NONE
There are cases where a subset of the addresses associated with an interface need special handling. Here's an example.
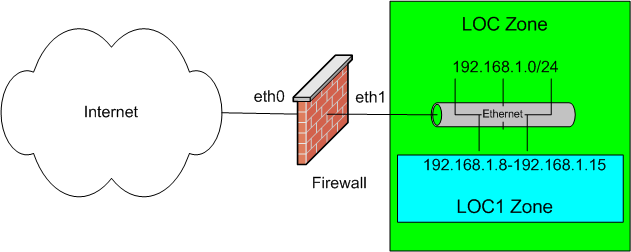
In this example, addresses 192.168.1.8 - 192.168.1.15 (192.168.1.8/29) are to be treated as their own zone (loc1).
/etc/shorewall/zones
#ZONE       TYPE      OPTIONS
loc         ipv4
loc1:loc    ipv4
/etc/shorewall/interfaces
#ZONE               INTERFACE           BROADCAST
loc                 eth1                192.168.1.255
/etc/shorewall/hosts
#ZONE               HOSTS
loc1                eth1:192.168.1.8/29
You probably don't want Shorewall to set up infrastructure to route traffic between “loc” and “loc1” so you should add these two policies.
/etc/shorewall/policy
#SOURCE             DEST                 POLICY
loc                 loc1                 NONE
loc1                loc                  NONE
Nested zones may also be used to configure a “one-armed” router (I don't call it a “firewall” because it is very insecure. For example, if you connect to the internet via cable modem, your next door neighbor has full access to your local systems as does everyone else connected to the same cable modem head-end controller). Here eth0 is configured with both a public IP address and an RFC 1918 address (More on that topic may be found here). Hosts in the “loc” zone are configured with their default gateway set to the Shorewall router's RFC1918 address.

/etc/shorewall/zones
#ZONE       TYPE      OPTIONS
net         ipv4
loc:net     ipv4
/etc/shorewall/interfaces
#ZONE               INTERFACE           BROADCAST
net                 eth0                detect
/etc/shorewall/hosts
#ZONE               HOSTS                              OPTIONS
loc                 eth0:192.168.1.0/24                maclist
/etc/shorewall/masq
#INTERFACE              SOURCE          ADDRESS
eth0:!192.168.1.0/24    192.168.1.0/24
Note that the maclist option is
specified in /etc/shorewall/interfaces. This is to
help protect your router from unauthorized access by your friends and
neighbors. Start without maclist then add
it and configure your /etc/shorewall/maclist
file when everything else is working.